Crafting the ideal garden boundary can sometimes be a tricky affair. The perfect choice of materials, marrying longevity with allure, often bewilders many. If you've been pondering over the use of railway sleepers on soil for your upcoming endeavour, you've stumbled upon a solution that impeccably blends functionality with aesthetics.
Railway sleepers add clarity and form, morphing areas into meticulous arenas of charm and usability.
Familiar with the fact that railway sleepers serve as remarkable options for garden borders and raised beds alike? This article details the method of positioning these sleepers precisely onto soil, ensuring your garden boundaries are as appealing as they are steady and enduring.
From deciding common sleepers, on a preference of softwood or hardwood to placing them securely, we brief you on everything needed to begin installing sleepers in your garden efficiently.
Join us on this journey.
What are the benefits of using garden sleepers?
Garden sleepers provide an attractive and useful method to improve outdoor areas. They are perfect for landscaping materials constructing raised beds, borders, and retaining walls. These wooden beams offer a natural look that integrates seamlessly with any garden design.
Garden sleepers function not merely as practical components aiding in soil erosion control, but also organise various spaces within the garden effectively. Their flexibility in various landscaping projects is unparalleled, ensuring their popularity amongst architects and homeowners alike.
Using railway sleepers in the garden forms a sturdy structure that can endure the passage of time, one landscape architect mentions. Such durability is a result of their construction to buttress railway tracks, implying their ability to handle heavy weights and persist for years outside. Choosing railway sleepers for garden projects becomes an environmentally friendly choice as well as a cost-efficient solution due to their long lifespan and resistance against factors like water from the ground or wood-rot fungus.
Why choose railway sleepers for your garden?
Choosing railway sleepers for your garden offers a blend of durability and aesthetic appeal that is hard to match. These heavy-duty materials can withstand harsh weather, making them ideal for creating lasting edging and planters in your outdoor space.
They bring a rustic charm that complements both modern and traditional designs, easily integrating with various landscape styles.
Railway sleepers are versatile enough to handle projects of any size, from simple flower beds to more complex constructions like steps or retaining walls. This makes them the best choice for architects, builders, contractors, interior designers, and homeowners looking to add a unique touch to gardens while ensuring results stand the test of time.
Their ability to define spaces within a garden helps in organising outdoor areas of vegetable gardens into distinct sections for gardening, leisure, or play.
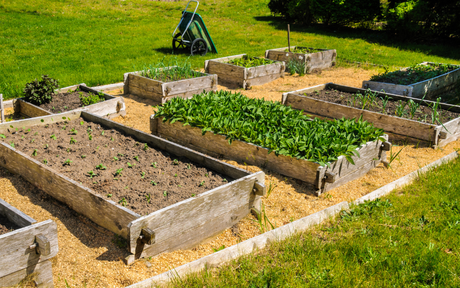
Advantages of creating a raised bed with sleepers
Creating a raised bed with sleepers brings numerous benefits for architects, builders, contractors, interior designers, and homeowners. These structures provide excellent drainage, keeping water from the soil away from plant roots and preventing waterlogging.
This aspect is particularly crucial in areas prone to heavy rainfall or with clay-heavy soils. The elevation of the beds enhances the aesthetic appeal of any garden or outdoor space, offering a clear definition between different sections of a garden or lawn.
It allows for more controlled soil conditions as well, enabling gardeners to create specific environments suited for various types of plants which may not thrive in the native ground soil.
Using sleepers to lay sleepers for garden edging or to make raised beds adds an element of versatility and durability that other materials cannot match. Sleepers are strong enough to hold back soil effectively while providing a natural look that blends seamlessly into outdoor environments.
They are also ideal for steps or edging around patios and paths, adding texture and interest with their rustic appearance. Moreover, laying railway sleepers on soil does not require complex tools or extensive groundwork preparation making it an accessible project for DIY enthusiasts as well as professionals seeking efficient solutions that deliver long-lasting results.
How sleepers can define spaces within a garden
Railway sleepers have become a popular choice for defining spaces within a garden, creating clear divisions and adding structure. They serve as ideal edging for your lawn or flower beds, offering both an aesthetic appeal and practical benefits.
Organising the soil with sleepers helps to maintain distinct areas, setting apart walkways from plant regions and simplifying the upkeep process.
Using sleepers to edge gardens also presents an opportunity to experiment with height and texture. Garden designers often use one or two sleepers in height to create elevated beds that offer visual appeal while improving plant drainage.
This method organises the garden effectively and increases accessibility for tasks like weeding and planting. Now let's understand how best to lay railway sleepers on soil.

How do I lay railway sleepers on soil?
Laying railway sleepers on soil requires precision and preparation. This task can transform any garden by adding structure and aesthetic appeal. Here’s how to do it effectively:
-
Choose the right location for your sleeper edging or raised bed in the garden. It should be a flat, clear area without any vegetation or debris.
-
Measure the area to determine how many sleepers you will need. Always buy a few extra in case of mistakes or adjustments.
-
Clear the chosen site of any plants, stones, and other obstacles to ensure an even surface.
-
Dig a shallow trench where you plan to lay garden sleepers. The depth depends on whether your design is flush with the ground or raised.
-
Use a spirit level to ensure that the base of the trench is flat and even. Adjust it by adding or removing soil as necessary.
-
Lay a waterproof membrane at the bottom of the trench if you’re concerned about waterlogging or wood-decay fungus affecting your sleepers.
-
Place your first sleeper onto the soil in the trench carefully. Check it with a spirit level for horizontal alignment.
-
For raised beds or borders, stack sleepers high but make sure to check each layer’s levelness and stability.
-
To secure sleepers together and into position, use spikes or screws suitable for outdoor use, aiming for one at each end and another in the middle for longer pieces.
-
Overlap corners when creating shapes such as rectangles or squares for added strength in raised beds or garden edges.
-
Fill in around the placed sleepers with soil, sand, gravel, or concrete mix to stabilise them further if needed.
-
For sleeper steps or higher constructions, always consult with an engineer to ensure safety and stability requirements are met due to weight considerations.
Following these steps ensures that the laying concrete foundations for railway sleepers in your garden becomes a straightforward process that results in durable and visually appealing landscape features.
Steps for how to lay garden sleepers
Laying garden sleepers can transform your outdoor space into a structured and appealing area. Whether you're looking to create raised beds, edging, or retaining walls, the process involves clear steps.
-
Choose the right type of sleepers for your project. Hardwood sleepers last longer but are more expensive than softwood options.
-
Measure the area where you plan to lay the sleepers, ensuring you have enough material.
-
Clear the site of any weeds, debris and level the ground as much as possible.
-
Dig a shallow trench where each sleeper will lie, making it about half the depth of the sleeper for stability.
-
Place a waterproof membrane in the trench to help prevent wood rot and extend the lifespan of your garden sleepers.
-
Position your first sleeper in the trench carefully, checking that it is level from all sides.
-
Fill around the sleeper with soil or sand to secure it in place before moving onto laying the next one.
-
To fix railway sleepers to the ground, use spikes or screws designed for outdoor use to ensure they remain stable over time.
-
For raised beds or structures requiring multiple layers of sleepers, stack them securely and fasten each layer together with landscaping screws.
-
Use a spirit level throughout the process to check every sleeper is perfectly horizontal or vertical depending on your design.
Moving on, let's discuss how best to secure these railway sleepers once they're properly positioned.
Tools needed to lay sleepers
After planning how to lay your garden sleepers, the next step involves gathering the right tools for the job. Equipping yourself with the necessary gear makes the process smoother and ensures that you achieve professional results. Here is a list of essential tools and materials needed:
-
Tape measure - For precise measurements, ensuring your garden sleepers fit perfectly into place.
-
Spirit level - This tool helps keep sleepers straight and level, crucial for a neat appearance and structural integrity.
-
Crosscut saw or handsaw - Use this for cutting sleepers to your required lengths. It's vital in customising sleepers for your garden's layout.
-
Drill with wood drill bits - Necessary for pre-drilling holes through which you will drive screws or bolts to secure the sleepers.
-
Screws or landscaping spikes - These are used to fasten sleepers together securely. Choose long, durable screws designed for outdoor use.
-
Sledgehammer - Helps in driving landscaping spikes into the sleeper and ground, especially useful when securing corners or joining sections.
-
Shovel - You'll need this to dig trenches where your railway sleeper edging will sit or to adjust the soil level beneath sleepers.
-
Wheelbarrow – Essential for moving soil, compost, or gravel needed for levelling ground or filling raised beds made from sleepers.
-
Landscape fabric – This material prevents weeds from growing up through your sleeper project while allowing water to drain through.
-
Garden gloves – Protects your hands during work, especially when handling timber that might splinter.
-
Safety glasses – Essential protection when cutting wood or drilling, safeguarding against flying debris.
Gathering these tools before you start laying sleepers in your garden ensures you're prepared for each step of the project, from preparation to completion. With everything at hand, you can progress efficiently, reducing downtime and achieving better results that stand the test of time in creating stunning garden edges or building raised beds with railway sleeper edging.
How to prepare the ground for railway sleepers
After gathering your tools for laying sleepers, the next crucial step is preparing the ground. This process ensures a solid and stable structure and foundation for the sleepers, reducing future maintenance issues. Here’s how to properly prepare the soil for your railway sleepers:
-
Measure and mark out the area where you plan to lay garden sleepers. Use stakes and string to create a clear outline.
-
Clear the marked area of any plants, rocks, or debris. This makes sure nothing interferes with placing the sleepers.
-
Dig a shallow trench along your marked lines. The trench should be about 10-15cm deep to provide enough space for bedding material.
-
Level the bottom of your trench using a spade or a garden rake. A level base prevents sleepers from tilting over time.
-
Compact the soil at the bottom of your trench with a tamper or simply by walking over it. Compaction provides a firm base.
-
Lay down a layer of construction aggregate in your trench. Aim for a thickness of about 5-7cm to aid drainage and prevent waterlogging.
-
Smooth out the aggregate so it's even and compact it as well for extra stability.
-
Place a waterproof membrane on top of the aggregate if you’re concerned about wood decay or want to prevent weed growth underneath the sleepers.
-
Carefully position your first sleeper onto this prepared base, checking that it is level before adding more sleepers.
10 Preparation steps like these help you keep sleepers in place and extend their lifespan in your garden project.
By following these guidelines, architects, builders, contractors, interior designers, and homeowners can ensure that their garden design benefits from both aesthetic appeal and structural integrity when they are how to lay railway sleepers on soil below.
What type of sleepers should I use?
Choosing between softwood sleepers and hardwood sleepers depends largely on your project needs. Softwood is affordable, making it an excellent choice for garden edging that won't break the bank.
It's lighter and easier to work with than hardwood, but doesn't last as long without treatment. Hardwood garden sleepers, made from durable woods like oak, offer a longer lifespan thanks to their natural resistance to decay.
They're ideal for projects demanding strength and durability, such as retaining walls or high-traffic areas in your garden.
The right sleeper can transform your garden into a robust outdoor space.
Timber sleepers come in various sizes and finishes, providing flexibility for creative landscaping designs. Reclaimed railway sleepers add rustic charm with their unique character and history, perfect for those seeking a vintage look.
Treated sleepers ensure longevity by resisting rot and insect damage, crucial for direct soil contact applications.
Next up: How do I secure railway sleepers to the ground?
Choosing timber sleepers for your project
Selecting the right type of timber, treated softwood sleepers, for your project is a critical decision. Softwood sleepers, often treated with preservatives, are cost-effective and suitable for projects where aesthetics are less of a priority.
On the other hand, hardwood sleepers offer durability and natural resistance to rot without chemical treatment, making them ideal for garden edging and raised beds where longevity and appearance matter.
For those aiming for a modern garden look or dealing with heavy soil pressure in retaining walls, choosing hardwood could be the best choice due to its strength. In contrast, softwood may suit temporary structures or low border edges well.
Architects and builders recommend considering factors like weather exposure, soil conditions, and intended use before deciding which timber sleeper will meet your needs effectively.

Best sleepers for garden edging and retaining walls
After choosing timber sleepers for your next garden landscaping project, the next step is deciding on the best options for garden edging and retaining walls. Hardwood sleepers are ideal due to their longevity and strength.
They can withstand weather conditions and heavy soil pressure without succumbing to rot or decay quickly. For a more modern look in the garden, new oak sleepers present a very neat look, and tidy appearance but come at a higher cost.
For those seeking durability with a touch of character, reclaimed railway sleepers add rustic charm to any garden design. These sleepers have already stood the test of time and can offer an environmentally friendly option by repurposing old materials.
Whether you're constructing raised beds or creating defined garden edges, selecting the right type of sleeper will ensure that your landscaping stands strong for years.
The right choice of sleeper transforms simple gardens into structured landscapes.
How do I secure railway sleepers to the ground?
Securing railway sleepers to the ground is essential for creating stable garden edges, raised beds, or retaining walls. Here are steps and tips to ensure your garden railway sleepers will stay put and maintain their form over time.
-
Choose the right spot: Find a level area in your garden where waterlogging is not an issue. Make sure it can support the weight of the sleepers.
-
Prepare the ground: Clear away sod or weeds. Create a shallow trench that matches the dimensions of your sleepers.
-
Use a membrane: Lay a waterproof membrane in the trench to prevent moisture from damaging the timber.
-
Place your sleepers: Position the sleepers into the trench, ensuring they fit snugly against one another.
-
Level them out: Check with a spirit level to make sure all sleepers are even.
-
Secure with spikes: Drive long metal spikes through pre-drilled holes in each sleeper down into the ground below.
-
Use screws for additional strength: Connect adjacent sleepers by drilling screws into their sides at an angle, creating a firm bond between them.
-
Overlap for stability: If building multiple layers, overlap sleepers like brickwork for added strength.
-
Consider concrete foundations for heavier structures: For large projects or sloped areas, laying a concrete foundation can provide additional support needed to keep the sleepers secure.
-
Regular inspection and maintenance: Ensure your structure remains stable and safe by regularly checking and tightening any loose fixtures.
By following these steps, you can confidently secure railway sleepers in place, crafting a durable and attractive addition to your garden that will last for years to come.
Using spikes and screws to fix railway sleepers
Railway sleepers can transform your garden, creating beautiful edges or raised beds. Fixing them securely into the ground is key to ensuring their longevity and effectiveness. Here are steps to use spikes and screws for this task:
-
Lay your sleepers in the desired position on the soil. Make sure they align with your garden's design.
-
Mark the spots on the sleepers where you will drive in the spikes or screws. This ensures even spacing.
-
Pre-drill holes into the railway sleepers to make inserting the screws easier and prevent the wood from splitting.
-
Choose long, heavy-duty steel spikes or screws that can penetrate both the sleeper and deeply enough into the ground below.
-
Hammer the spikes or use a power drill to screw through the pre-drilled holes until secure against the soil.
-
For added stability, fix each sleeper to its neighbour by drilling sideways at intervals, creating a strong bond between each sleeper.
-
Use a spirit level to check that all sleepers lay flat and even after fixing them in place.
-
Where layers of sleepers are needed, overlap them like bricks in a wall to ensure no continuous lines weaken the structure.
-
In damp conditions, applying a waterproof membrane over their bases before installation helps keep sleepers dry.
Follow these steps carefully to lay railway sleepers onto ground securely with spikes and screws, ensuring they remain in place for years to come while enhancing your garden's look and functionality.
Tips for how to keep the sleepers in place
Securing sleepers with metal plates, spikes and screws ensures they are firmly anchored to the ground. Yet, maintaining these sleepers in position requires further strategies. One operative method involves laying a waterproof membrane beneath the sleepers.
This shield stops moisture from seeping up, which could shift or weaken them over time. For improved stability, sinking the lower part of the sleeper into a shallow trench can also help anchor them securely.
Overlap the ends of adjacent sleepers to create interlocking corners. This technique strengthens the overall structure and also improves its aesthetic appeal by giving it a coherent look.
Utilise heavy-duty exterior wood screws to connect each sleeper at their overlapping points. Ensuring each piece securely interlocks will maintain your garden edges or raised beds undamaged for many years to come.
Making sure you overlap the sleepers
Ensuring the most popular garden sleepers' placement maintains stability is significant, and an efficient method to facilitate this stability is through interlacing them. Layering garden sleepers when organising them for your project fortifies the design and also brings a visually pleasing pattern that improves the comprehensive design of your garden edges or raised garden beds.
Confirm that each sleeper extends past the one beneath by at least 30cm. Implementing such a technique forestalls any displacement and conserves a consistent appearance throughout your garden.
Interlacing sleepers form a firm, united structure, vital for enduring garden features.
This interlacing strategy is effective in case you're designing straight lines or curves in your landscape design. By fastening sleepers into position using this scheme, you give added fortification against soil pressure for retaining wall walls or elevated beds.
Always utilise suitable fasteners such as screws or spikes intended for outdoor utilisation to retain interlaced sleepers tightly linked to each other and grounded.

How do I create a raised bed with railway sleepers?
Constructing a raised bed with railway sleepers can bring a new flair to your garden by introducing clear lines and character. This method improves soil control and grants a delightful element to any outdoor area.
-
Determine the dimensions and position of your raised bed. Confirm it's situated on flat terrain to avoid water accumulation at one side.
-
Gauge the space where you intend to position garden sleepers, remembering that typical sleepers are generally 2.4m long.
-
Rid the area of any undesirable plants or rubbish. This action is vital to establish a firm base.
-
Equalise the earth where you intend to set the sleepers. This assures that your foundation is steady.
-
Install a waterproof membrane to guard against water damage to the wood over time.
-
Begin laying the first tier of sleepers straight on the prepared soil, verifying their level as you proceed.
-
Utilise spikes or screws to root the railway sleepers into the soil, anchoring them securely.
-
Pile subsequent tiers of sleepers atop the initial one, overlapping them at the corners for reinforcement.
-
Stabilise each layer of sleepers collectively using lengthy screws or rebar to guarantee their steadfastness.
-
Charge your fresh raised bed with a combination of topsoil and compost, set for cultivation.
This technique enhances your garden's appearance and also facilitates gardening chores due to superior access and soil health.
Up next, we'll examine how to sustain these railway sleeper features efficiently in your gardening zone.
Designing a raised bed layout with sleepers
Designing a raised bed layout with sleepers requires planning and understanding of your garden's needs. Start by measuring the area where you plan to lay garden sleepers for your raised beds or retaining walls.
This helps in buying the right amount of materials without waste. Sketch out a design on paper, factoring in access for watering and maintenance. Opting for hardwood sleepers over softwood can ensure a longer lifespan for your structure due to better resistance against rot and decay.
Laying garden sleepers starts with preparing the ground foundation (engineering) to prevent waterlogging (agriculture). A shallow trench might be needed to secure the sleeper wood the base. Position each garden sleeper carefully, ensuring they're level and straight.
For extra stability, fix railway sleepers together using spikes or screws designed for outdoor use, which will keep them firmly in place over time. Consider adding a waterproof membrane between soil and timber if water retention is a concern, safeguarding against moisture damage from below.
How to lay garden sleepers to make a raised bed
Creating a raised bed with garden sleepers can certainly alter your outdoor setting. This technique not only promotes better drainage and soil condition but also augments the visual charm of the raised planters your garden.
-
Identify a suitable site for your raised bed. Ensure that ample sunlight is available for the plants you wish to cultivate.
-
Size up the region where you aim to position the sleepers, with an understanding that standard sleepers measure 2.4m in length.
-
Rid the area of weeds, stones, and miscellaneous rubbish in readiness for sleeper installation.
-
Spread a waterproof membrane on the purged terrain. This halts weed proliferation and shields the timber sleepers from dampness.
-
Situate the inaugural layer of sleepers right atop the membrane, confirming they're evenly aligned and perpendicular to one another.
-
Utilise a spirit level to verify alignment and make minor tweaks by either adding or taking away soil beneath the sleepers.
-
Fasten each sleeper to the next with extensive screws or railway spikes, confirming they are firmly attached together.
-
Pile an additional layer of sleepers on top if you're crafting a bed that’s one or two sleepers lofty, overlapping at corners for augmented stability.
-
Attach the second tier of sleepers to the first layer utilising screws or spikes, drilling holes beforehand to facilitate this task.
-
Load your fresh raised bed with a blend of topsoil and compost until it's around 30 cm beneath the brim of the loftiest sleeper.
-
Sprinkle lightly after loading, allowing soil compacting prior to seeding your preferred flowers, herbs, or vegetables.
-
Carry out regular checks on your garden sleepers for signs of wear or decay, applying wood preservative when required to prolong their longevity.
Securing sleepers together for stability
To ensure stability, securing sleepers together is crucial. Use long screws or bolts for this task. This method keeps the sleepers fixed firmly against each other, preventing any movement that could destabilise your garden structure.
Make sure to overlap the sleepers at corners to increase strength and stability.
Choose screws or spikes that are suitable for outdoor use to avoid rust and decay. This step is vital in creating a solid surface durable garden edge or raised bed that withstands weather changes.
After securing the sleepers, it's time to focus on waterproofing them to prolong their lifespan.
What are some tips for maintaining railway sleepers in the garden?
Maintaining railway sleepers in your garden requires regular checks to prevent rot and decay. One effective method is applying wood preservation treatments to reclaimed sleepers every two years. This helps in safeguarding the timber against moisture, insects, and fungi.
For those situated in wetter climates or looking for an extra layer of protection, consider laying a waterproof membrane beneath the sleepers. This action keeps moisture away from the timber, prolonging its life.
Inspecting and maintaining your railway sleepers regularly can significantly extend their lifespan.
Cleaning plays a crucial role too. Use a stiff brush to remove dirt and debris periodically from the sleepers’ surface. If you spot any signs of wear or damage during inspections, address these issues immediately to avoid further deterioration.
Simple steps like these ensure that your garden edges stay beautiful and functional for years to come.
Preventing rot and decay in timber sleepers
Protecting timber sleepers from rot and decay is crucial for their longevity. Applying a waterproof membrane ensures that wooden sleepers don’t soak up moisture from the soil, which is a common reason for decay.
Treat the wood with preservatives to fend off fungi and insects that can cause harm. These chemicals create a barrier that makes the timber resistant to external threats.
To further extend their life, position garden sleepers on a gravel bed or use concrete supports. This method prevents direct contact with damp soil, reducing moisture absorption significantly.
For best results, choose hardwood sleepers known for their natural resistance to rotting. Next, learn how to clean and treat garden sleepers to maintain their appearance and durability over time.
How to clean and treat garden sleepers
Cleaning and treating garden sleepers keep them looking good and extends their life. Start by sweeping off any dirt or debris. Use a stiff brush for stubborn spots. Next, wash the most popular garden sleepers with a mild soap and water solution, rinsing well afterwards.
Allow them to dry completely before applying a treatment.
Choose a suitable wood preservative to protect the sleepers from rot, decay, and insects. Apply this treatment according to the manufacturer's instructions, using a brush or roller for even coverage.
For raised-bed gardening or when in contact with soil, consider a waterproof membrane on the sides of sleepers that are underground to prevent moisture damage. Regular inspections help catch any issues early on, ensuring your garden’s wooden features remain in top condition for years.
Inspecting and maintaining your railway sleepers regularly
Checking your garden sleepers often prevents rot and keeps them looking good. Every few months, inspect for signs of wear or damage. If you spot any issues, act quickly to avoid more problems later on.
Use a wire brush to remove dirt and debris from the surface of the sleepers. This simple step helps maintain their condition and extends their lifespan.
Treating the wood paint your railway sleepers with a chemical substance like varnish can also protect them from weathering and pests. Apply a new coat annually to shield the wood against rain and sun damage.
Make sure to clean the sleepers thoroughly before applying any treatments. This routine care keeps your garden edges beautiful and durable for years to come.
Conclusion
Laying railway sleepers on soil transforms your garden edge beautifully. This method is both practical and easy to follow. It brings a significant improvement to any outdoor space.
For further guidance, exploring more resources helps expand your knowledge. Garden edges created with sleepers make a lasting impact. Let's reshape our gardens into something remarkable together.